 By Maya Reed, Editor
Reviewed & updated September 2026 · Researched, AI-assisted & human-reviewed
Educational information only — not medical advice. Learn more
The lunge looks simple — step forward, bend, stand back up — which is exactly why so many people get it wrong. Done well, it builds single-leg strength, balance, and hip mobility that squats alone can't match. Done poorly, it turns into a knee-wobbling, hip-shifting mess that stalls progress and invites nagging pain.
This article is for general fitness education, not medical advice. If you have joint pain or an existing injury, check with a healthcare provider before adding lunges to your routine.

(img)
What this guide coversCurated by Maya · 7 min readWhy the lunge deserves a spot in your routine
Most lower-body training centers on bilateral moves like squats and deadlifts, where both legs share the load evenly. The lunge breaks that pattern. It forces one leg to do the work while the other stabilizes, which exposes — and eventually fixes — the strength and balance differences between your left and right sides that a squat can hide.
That single-leg demand also carries over well to real life: climbing stairs, stepping off a curb, catching your balance when you trip. Few gym exercises train that specific skill as directly as the lunge does.
Setting up: stance and starting position
Stand tall with your feet hip-width apart, core braced, and shoulders stacked over your hips. Hands can rest on your hips, hold light dumbbells at your sides, or stay loose for balance — start with bodyweight until the pattern feels automatic.
Before you move, take a breath and think about keeping your torso upright throughout the rep. A common early mistake is leaning forward as you step, which shifts load off the legs and onto the lower back.
The step-by-step movement
- Step forward with one leg, landing on a flat foot roughly a stride-and-a-half in front of you — not too short, not so long that you overreach.
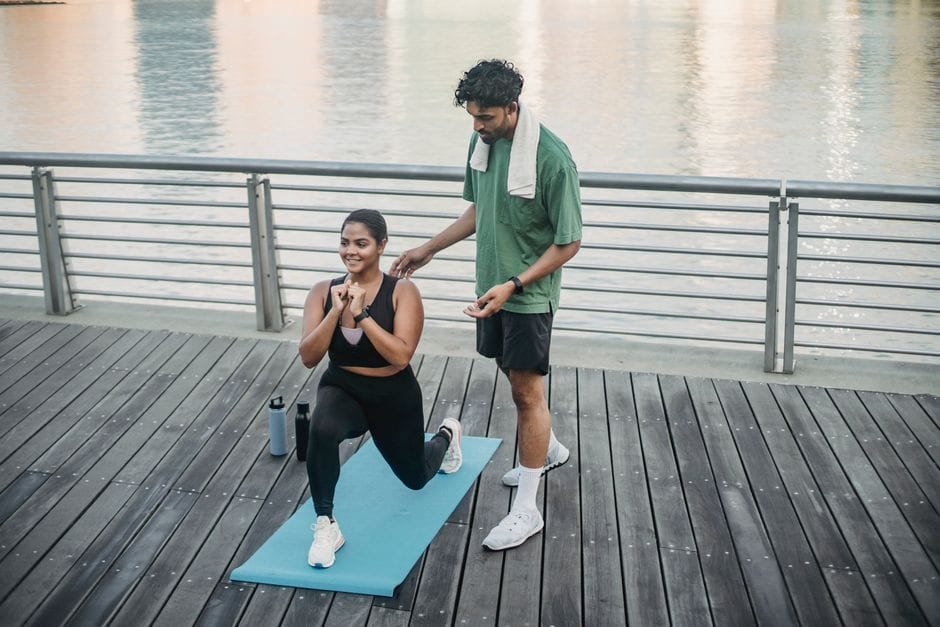
- Bend both knees at the same time, lowering straight down rather than lunging forward and then dropping.
- Stop when the back knee hovers just above the floor and the front thigh is roughly parallel to the ground.
- Drive through the front heel to push back up to standing, bringing the front foot back to meet the back foot.
- Repeat on the other leg, alternating or completing all reps on one side before switching, depending on the variation you're doing.
Keep the front knee tracking in the same direction as your front toes — it shouldn't cave inward or shoot far past the toes on the way down.
The most common form mistakes
Knee collapsing inward. This usually signals weak hip stabilizers. Slow the rep down and consciously push the front knee outward, in line with the middle toe, as you descend.
Torso leaning forward. If your chest drops toward your front thigh, you're likely stepping too short or letting your core relax. Keep the ribcage stacked over the pelvis and take a slightly longer step.
Back heel staying flat. The back heel should lift naturally as you lower — forcing it flat restricts the ankle and knee unnaturally. Let it rise.
Bouncing off the bottom. Using momentum to spring back up robs you of muscle tension and control. Pause briefly at the bottom and drive up deliberately.
Overstriding. Too long a step makes it hard to keep the torso upright and shifts the exercise into more of a hip-hinge than a lunge. Adjust stride length until you can hit knee-hover depth without leaning.
Lunge variations to progress or regress
Reverse lunge — step backward instead of forward. Generally easier on the knees and a good starting variation for beginners.
Walking lunge — continue forward with each rep instead of returning to the start. Adds a balance and coordination challenge.
Static split squat — feet stay planted in a staggered stance for the whole set. Removes the stepping component so you can focus purely on the up-and-down pattern.
Lateral lunge — step out to the side instead of forward or back, targeting the inner and outer thigh differently.
Deficit lunge — front foot elevated slightly on a low platform, increasing range of motion for more advanced lifters.
Beginners generally do best starting with reverse lunges or static split squats, since both reduce the balance demand while you build the movement pattern, then progressing to forward and walking lunges as control improves.
Adding load and progressing over time
Once bodyweight lunges feel controlled for 12-15 reps per leg, add resistance. Holding a pair of dumbbells at your sides is the simplest entry point; a single dumbbell or kettlebell held at chest height (goblet-style) shifts more demand onto the core for stability.
Progress load gradually — small jumps of 2.5 to 5 pounds per hand are plenty for most people early on. Chasing heavier weight before the form is solid is the fastest way to turn a good exercise into a knee problem.
How lunges fit into a weekly routine
Lunges pair naturally with a squat or deadlift day, typically placed after the main compound lift since they're demanding on stability and coordination. Two to three sets of 8-12 reps per leg, once or twice a week, is enough to see steady strength and balance improvements over a few months — no need to overload every session.
The takeaway
The lunge rewards patience: slow, controlled reps with an upright torso and a front knee that tracks straight will build real single-leg strength and correct side-to-side imbalances that other exercises miss. Start with a regressed variation like the reverse lunge or split squat, nail the pattern with bodyweight, then add load gradually. Small, consistent form corrections beat rushing to heavier weights every time.
Frequently asked questions
Are lunges bad for your knees?
Not inherently — done with proper form, lunges are often used in rehab settings to strengthen the muscles around the knee. Pain usually comes from letting the knee cave inward, overstriding, or progressing load too quickly.
How deep should a lunge go?
Aim for the back knee to hover just above the floor and the front thigh close to parallel with the ground. You don't need to touch the knee down — depth should feel controlled, not forced.
Should I do lunges every day?
Two to three sessions a week is plenty for most people to see progress. Daily lunging with added weight doesn't give the stabilizing muscles enough recovery time and can lead to overuse soreness.
What's easier, forward or reverse lunges?
Reverse lunges are generally considered easier and gentler on the knees, since stepping backward reduces the deceleration force on the front leg compared to stepping forward.
Read next


Further reading & trusted sources
Worth knowing before you start
A knee that caves inward on lunges almost always traces back to weak hip stabilizers rather than a flexibility problem, which is why stretching does nothing to fix it while a slow, deliberate rep with conscious outward knee pressure often corrects it within a few sessions. Reverse lunges are quietly easier on the joints than forward lunges for the same depth, since stepping backward produces less deceleration force through the front knee — a detail most beginner guides skip when recommending where to start.
Maya’s editorial obsession is the gap between fitness hype and what the evidence actually shows — she’d rather hand you one boring habit that works than ten exciting ones that don’t. She builds FitNourish’s guides from mainstream, well-established sources (the CDC, the NHS, Mayo Clinic, and peer-reviewed research) and has a human review every one for accuracy before it publishes. She and the team are dedicated fitness enthusiasts and researchers, not doctors, so everything here is general information rather than medical advice. AI tools help with the research and drafting; the fact-checking and judgement are human.